Text to imagePortraitStyle guide
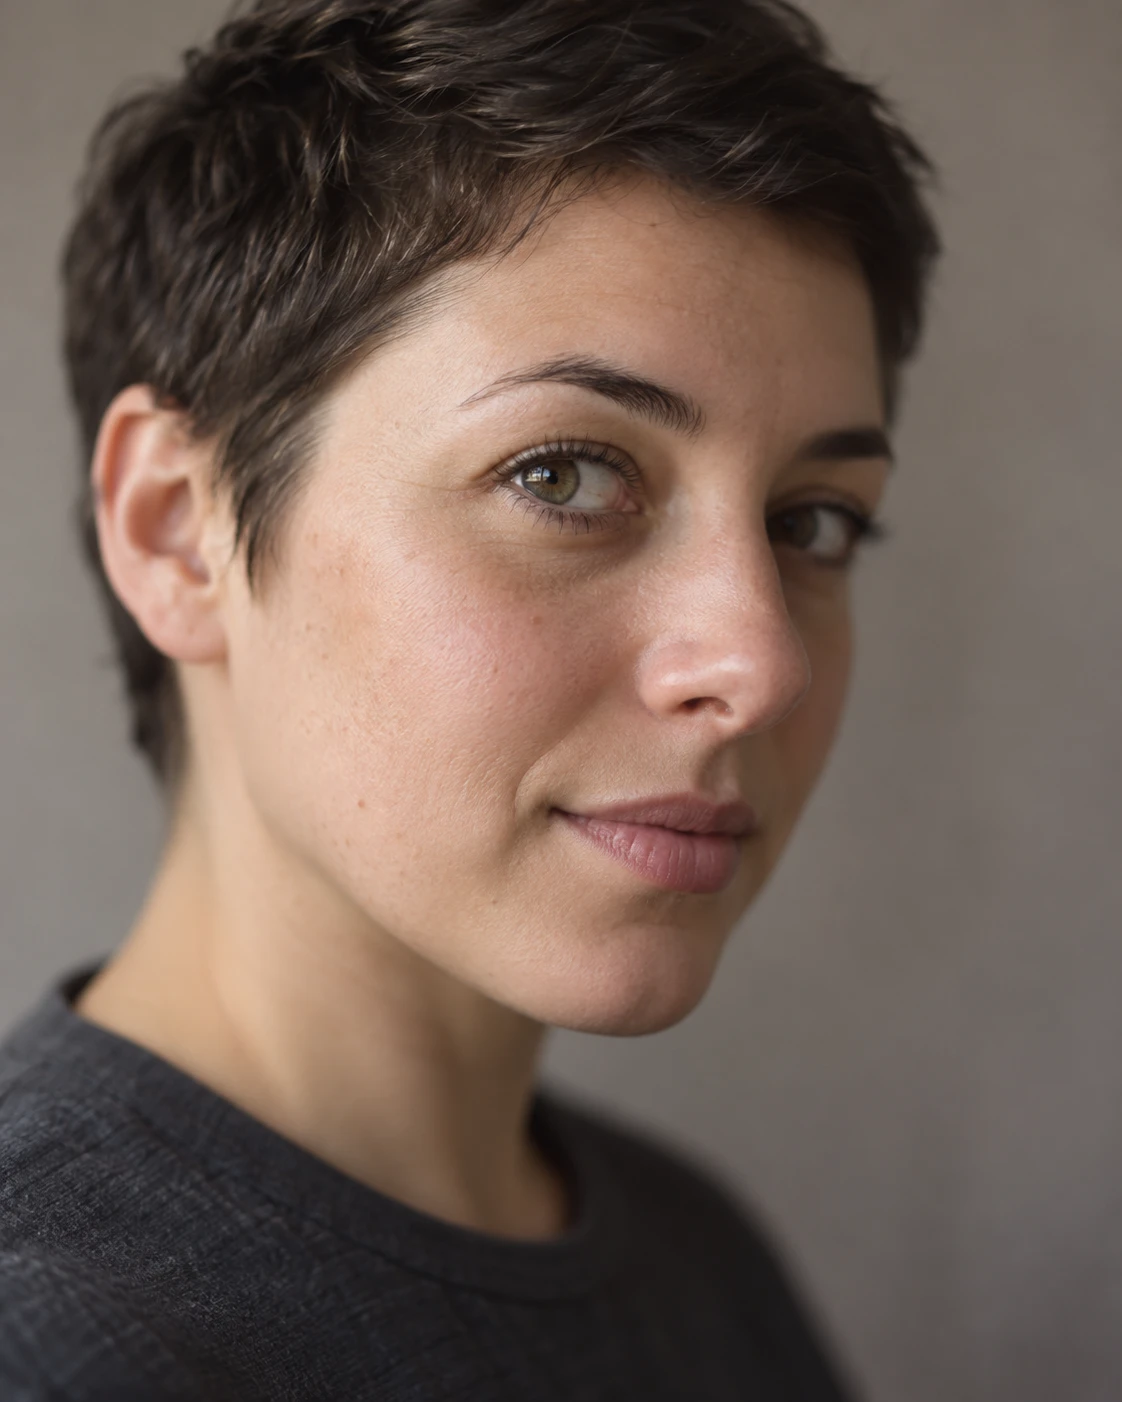
Short-Haired Adult · Near-Eye Selective Focus
A photographic portrait that reveals facial depth through a crisp near eye and progressively softer far eye and ear.
Short-Haired Adult · Near-Eye Selective Focus
- Shape & line
- Preserve the turned face's unequal visible widths: show the image-left cheek broadly and compress the image-right cheek beside the nose. Render the near iris rim, upper eyelid, and a few eyelashes with crisp boundaries, then soften the corresponding boundaries of the far eye without changing its anatomy.
- Color & light
- Use a large soft light from image-left to illuminate the broad near cheek and produce gentle shading toward image-right. Keep natural muted skin colors and enough light in the far eye to make its softer focus readable; avoid a dark shadow that could conceal the focus difference.
- Texture & material
- Keep subtle skin texture around the near eye and adjacent cheek, allowing pores and fine hairs to merge gradually into smooth tonal transitions toward the far temple and ear. Make the shirt matte and the background softly diffuse, with no artificial waxy skin smoothing.
- Composition
- Concentrate the sharpest focus on the image-left near eye, let the nose tip and image-right far eye become gently softer, and blur the far ear and plain warm-gray background more strongly. Keep this depth progression continuous rather than tracing a sharp cutout around the head.
Priority
Make the near-eye sharpness and gradual loss of focus across the turned face the main visual lesson.
What to avoid & what to check
Avoid equally sharp eyes, abrupt blur masks, and exaggerated facial distortion.
Confirm that the image-left eye is visibly sharper than the image-right eye and far ear.
Exact prompt for this example
SUBJECT
One adult with short cropped hair, wearing a plain charcoal crewneck shirt. Their face turns gently toward image-right while their eyes look toward the camera; the eye on image-left is nearer to the viewer, and the eye on image-right is farther away.

COMPOSITION
Frame the head and upper shoulders at eye level in a vertical close-up. Place the near eye slightly above center, leave a little breathing room toward image-right, and keep both eyes visible so their difference in focus can be compared.

STYLE GUIDE
1. Shape & line
Preserve the turned face's unequal visible widths: show the image-left cheek broadly and compress the image-right cheek beside the nose. Render the near iris rim, upper eyelid, and a few eyelashes with crisp boundaries, then soften the corresponding boundaries of the far eye without changing its anatomy.

2. Color & light
Use a large soft light from image-left to illuminate the broad near cheek and produce gentle shading toward image-right. Keep natural muted skin colors and enough light in the far eye to make its softer focus readable; avoid a dark shadow that could conceal the focus difference.

3. Texture & material
Keep subtle skin texture around the near eye and adjacent cheek, allowing pores and fine hairs to merge gradually into smooth tonal transitions toward the far temple and ear. Make the shirt matte and the background softly diffuse, with no artificial waxy skin smoothing.

4. Composition
Concentrate the sharpest focus on the image-left near eye, let the nose tip and image-right far eye become gently softer, and blur the far ear and plain warm-gray background more strongly. Keep this depth progression continuous rather than tracing a sharp cutout around the head.

PRIORITY
Preserve the requested identity, count, action, composition and output settings. Apply the style rules within those constraints; a style reference must not replace the subject or layout. Within the style: Make the near-eye sharpness and gradual loss of focus across the turned face the main visual lesson.

AVOID
Avoid equally sharp eyes, abrupt blur masks, and exaggerated facial distortion.

OUTPUT
One photographic portrait image in a 4:5 aspect ratio, with no lettering, captions, logos, or watermark.

SELF-CHECK
Confirm that the image-left eye is visibly sharper than the image-right eye and far ear.
Model information comes from image provenance. The same prompt may produce a different result.